Introduction
If an event is configured to allow it, your customers can submit a request for an outbound bill of lading and labels from the storefront. To learn how to make an event configured to allow bills of lading, see Event Settings.
Storefront Access
The customer accesses the "Request Pre-printed Bill Of Lading" link in the "Links" box on the storefront:
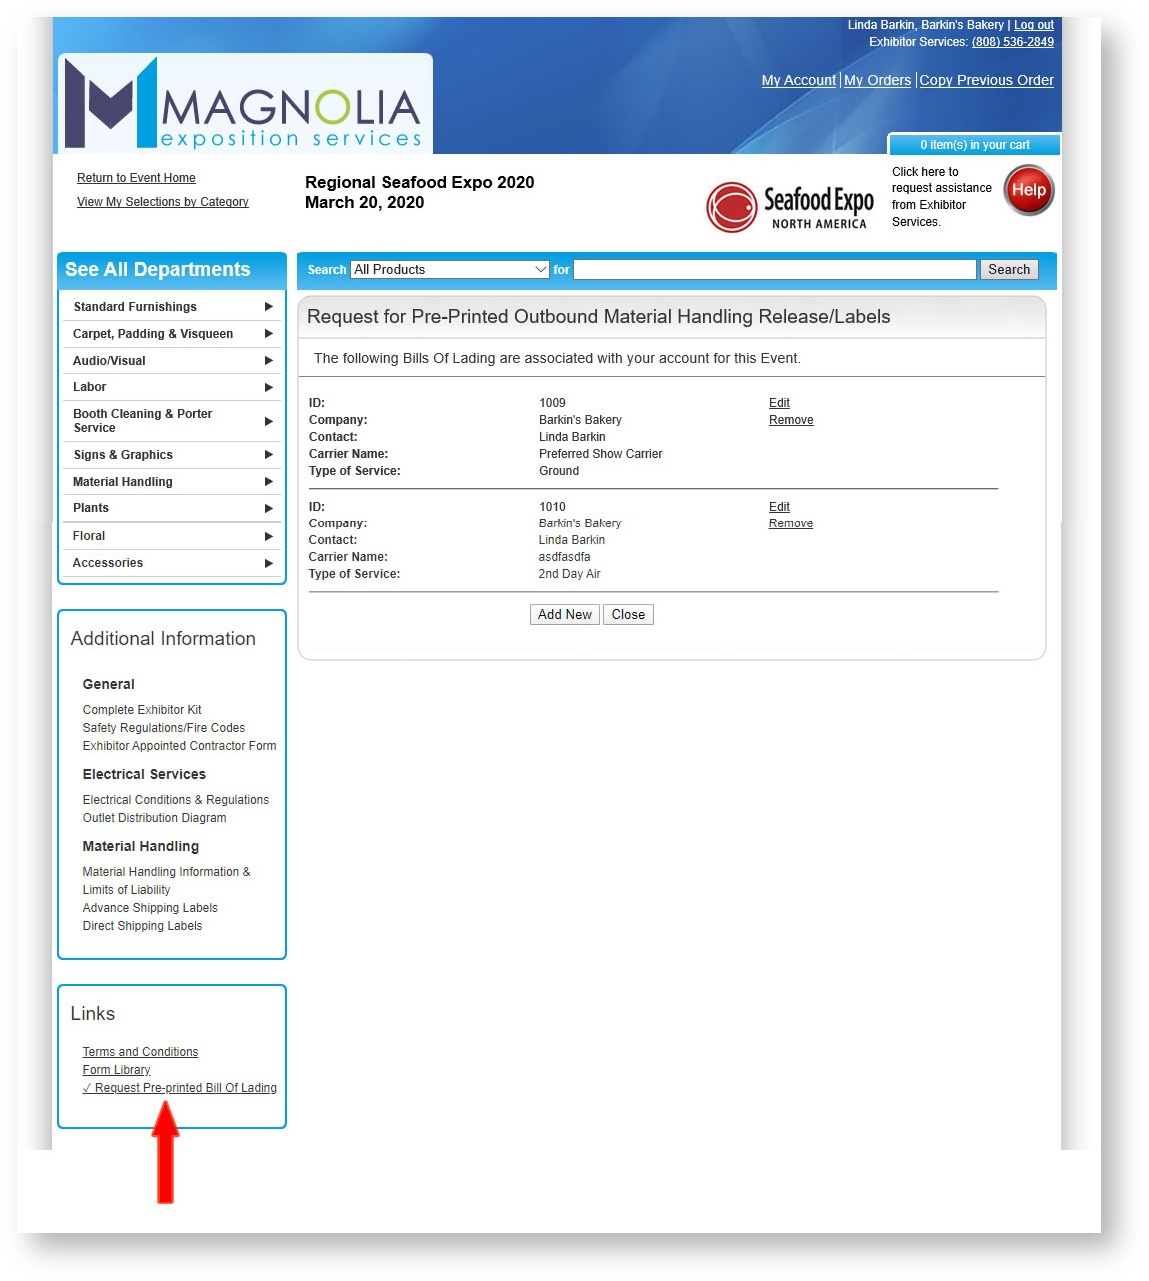
A check box at the beginning of the link means the customer has saved the detail of the request and an admin user can access in Boomer Admin.
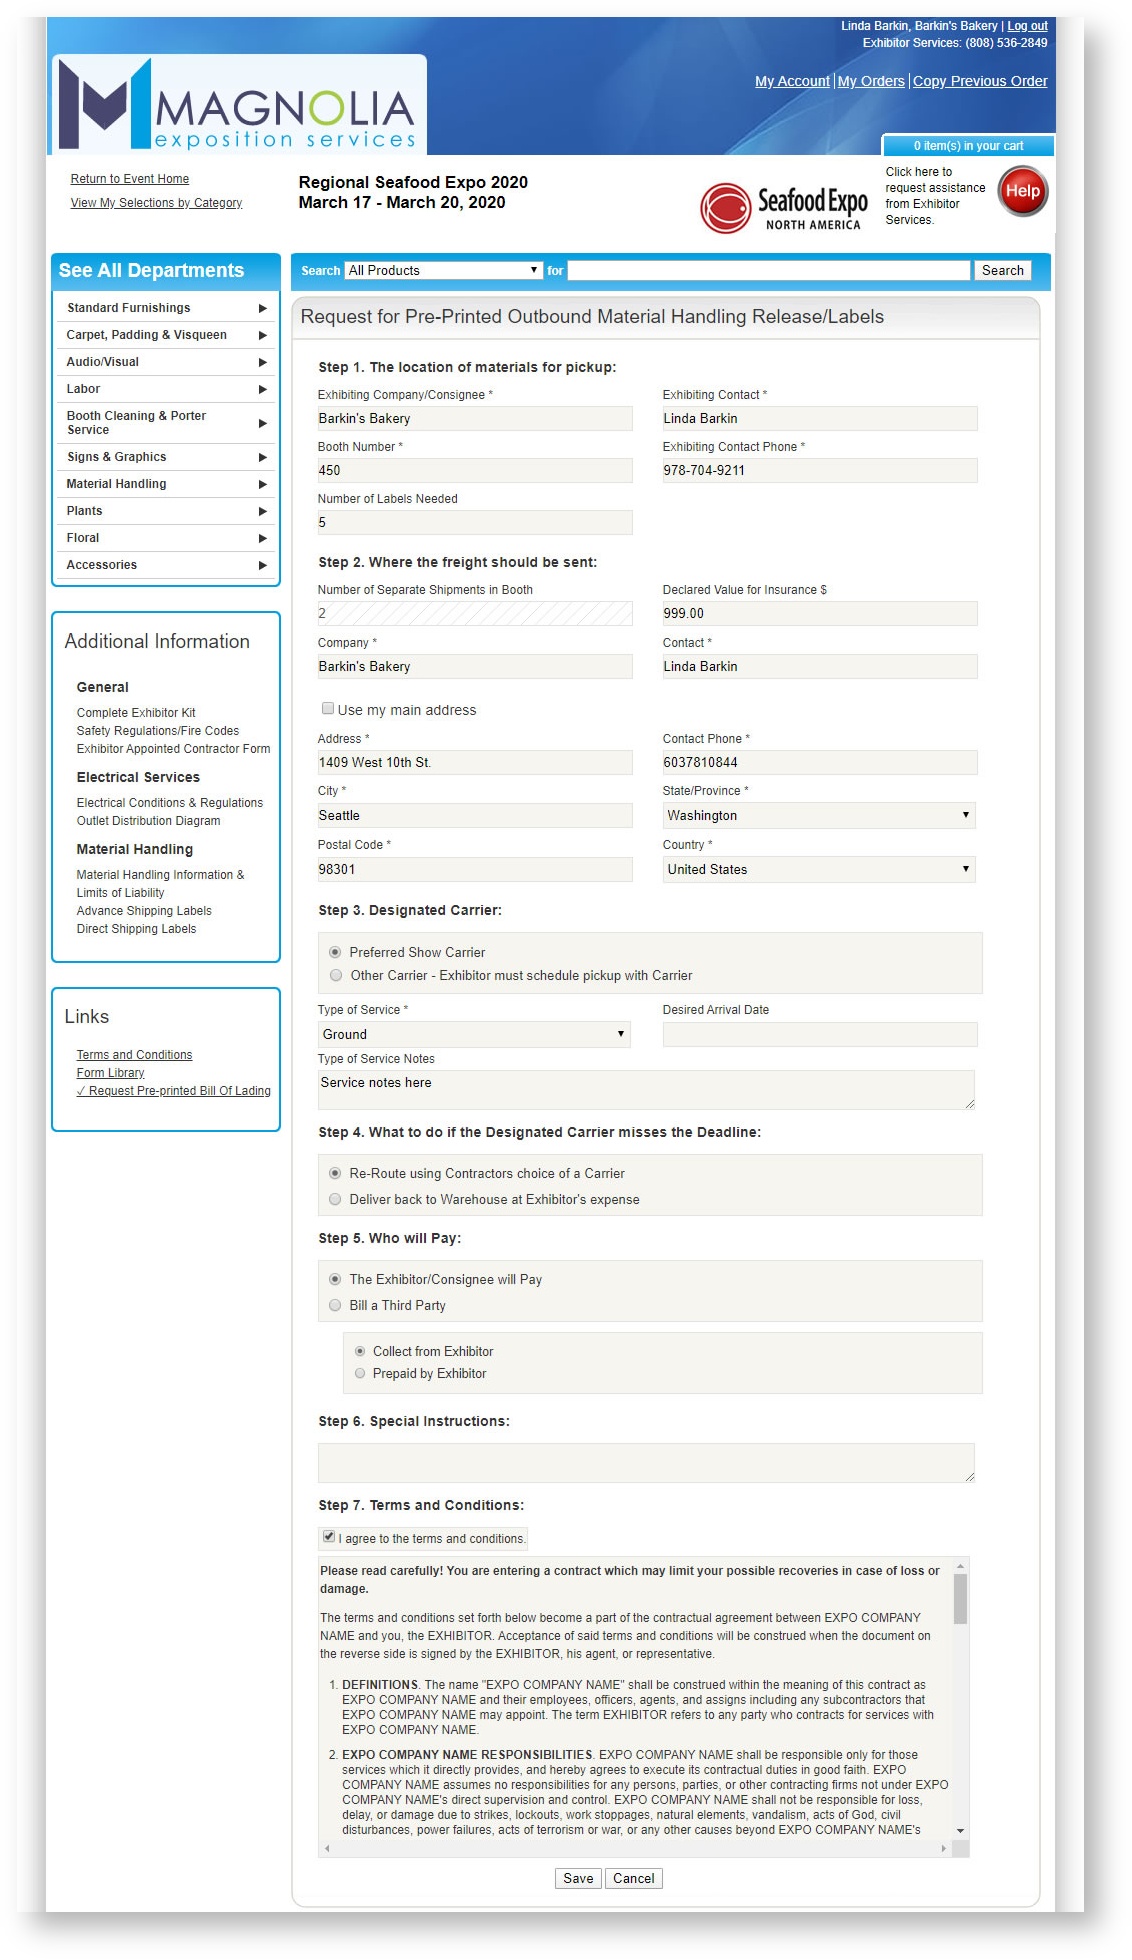
The customer may edit a bill of lading by clicking "Edit":
Admin Indicator
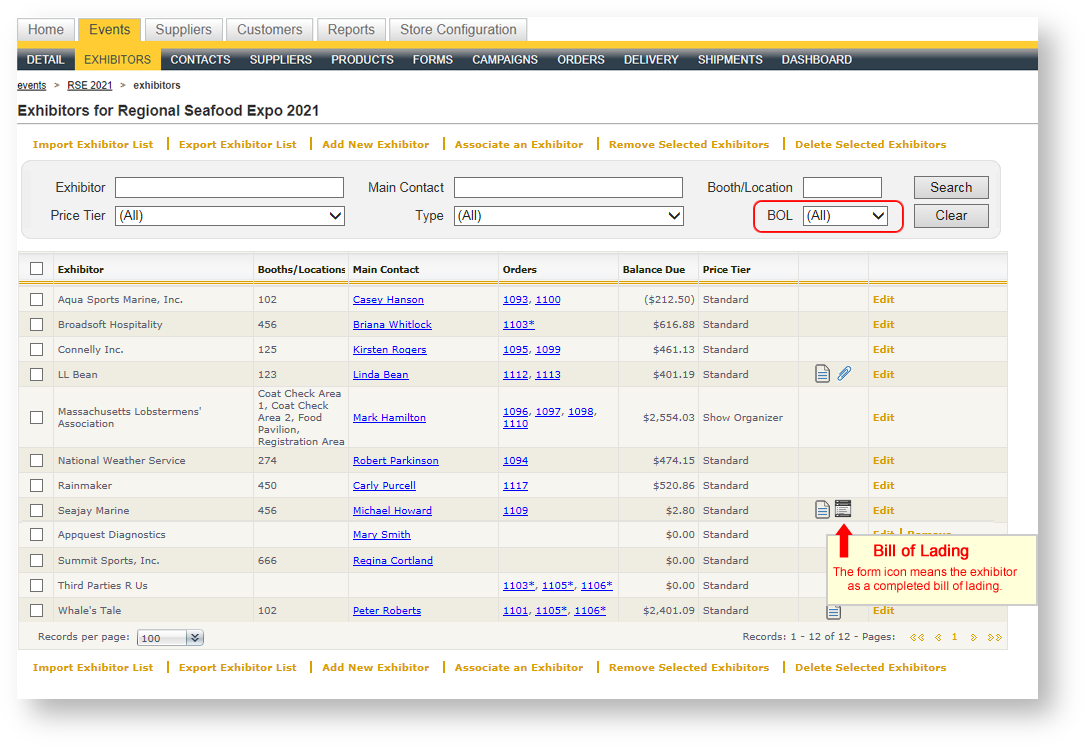
In Boomer Admin, if the bill of lading has been enabled for an event, the user will see a BOL filter at the top of the Exhibitors grid, and an icon indicating whether the customer has a bill of lading:
Sections below will provide details on Boomer Admin functionality.
Configuration
Before taking advantage of the bill of lading feature, there is a setting you may want to review, and text content that will appear on the actual form that you'll want to configure.
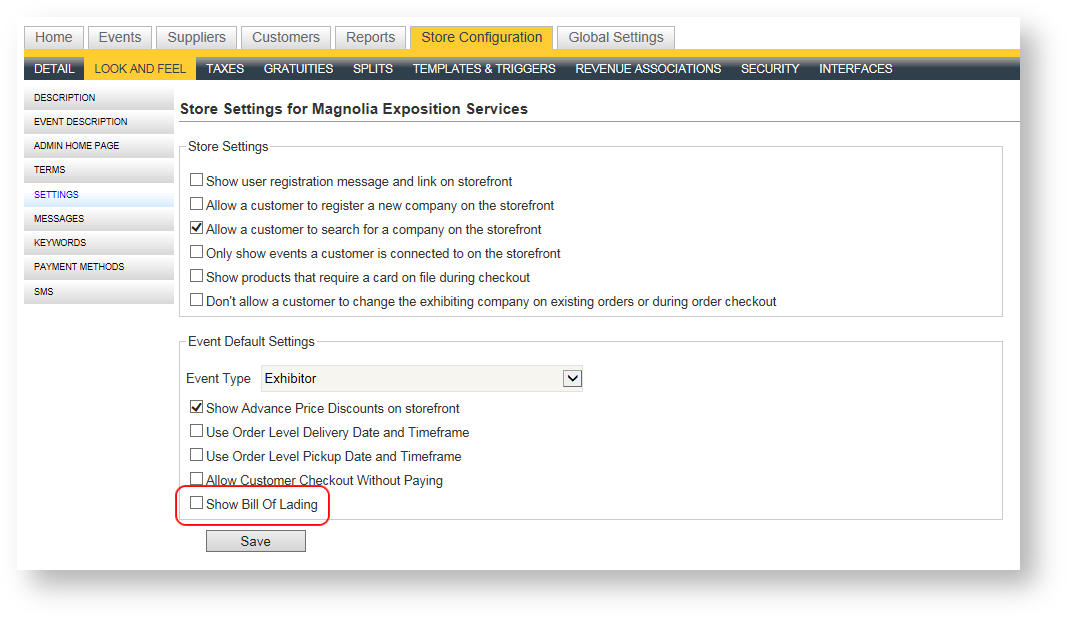
Default Store Level Setting
If you want the bill of lading feature enabled by default in any event you create, navigate to the Store Configuration area where the setting is located by following the below steps (note: you'll need Store Administrator rights to perform these steps):
- Click on Store Configuration
- Click on Look and Feel in the dark blue menu.
- Click on Settings down the left hand navigation menu.
- Check the "Show Bill of Lading" box.
- Click Save.
Set Up Customizable Bill of Lading Verbiage
There are three parts of the bill of lading that can be customized to the way you want to present terms, conditions, clauses and instructions on the bill of lading. All three of these sections are entered in the Store Configuration Area under Messages. In the drop down at the top of the text editor, you can choose each section to edit. They include:
- Bill of Lading Terms
- Bill of Lading Signature Clause
- Bill of Lading Instructions
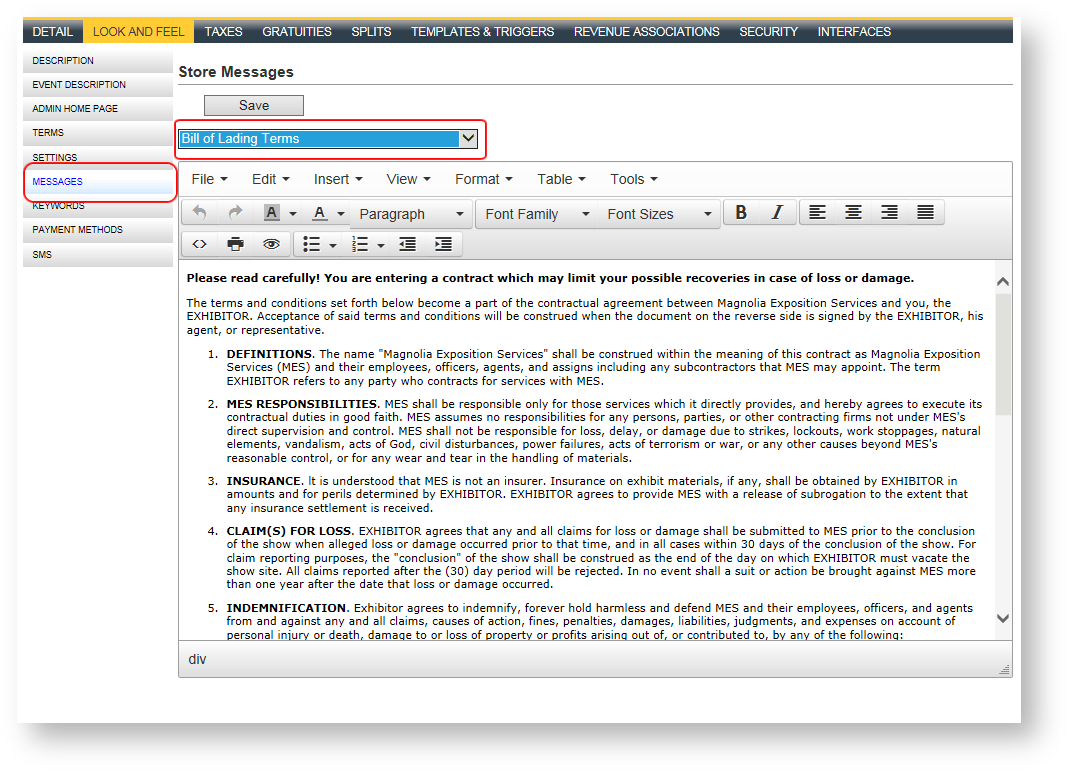
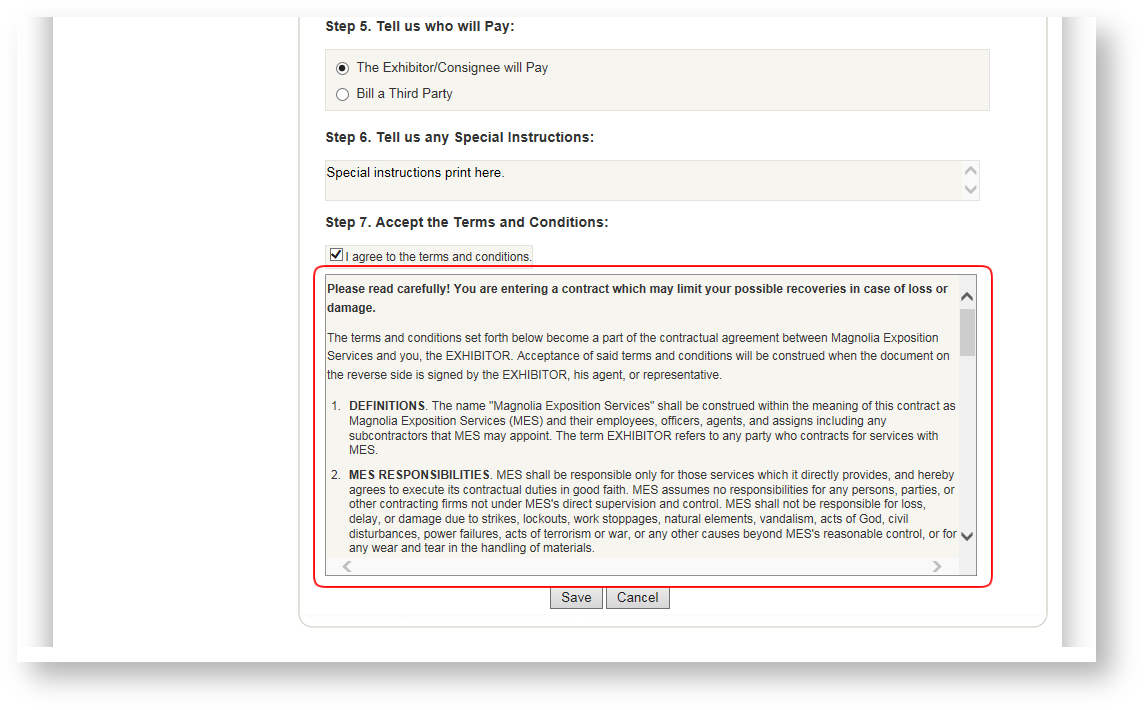
Bill of Lading Terms and Conditions
This verbiage appears at the bottom of the bill of lading on the storefront. It will require acceptance by the customer before the bill of lading can be saved. This verbiage should represent the legal clauses you want your customer to agree to:
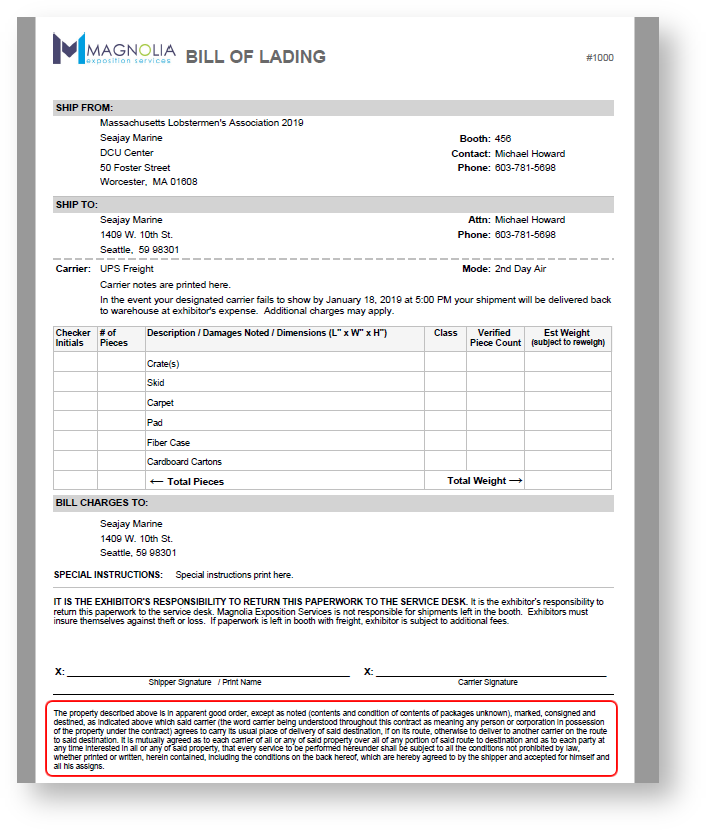
Bill of Lading Signature Clause
This verbiage appears at the bottom of the bill of lading, below the signature lines:
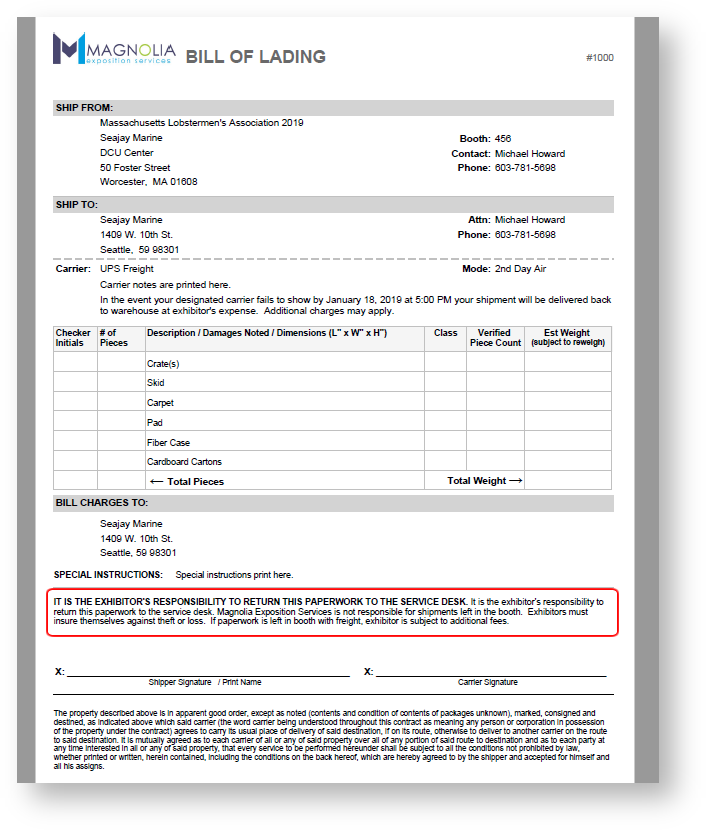
Bill of Lading Instructions
This verbiage appears above the signature line and is a good place to provide instructions about where to return the paperwork, the customer's responsibilities, etc.:
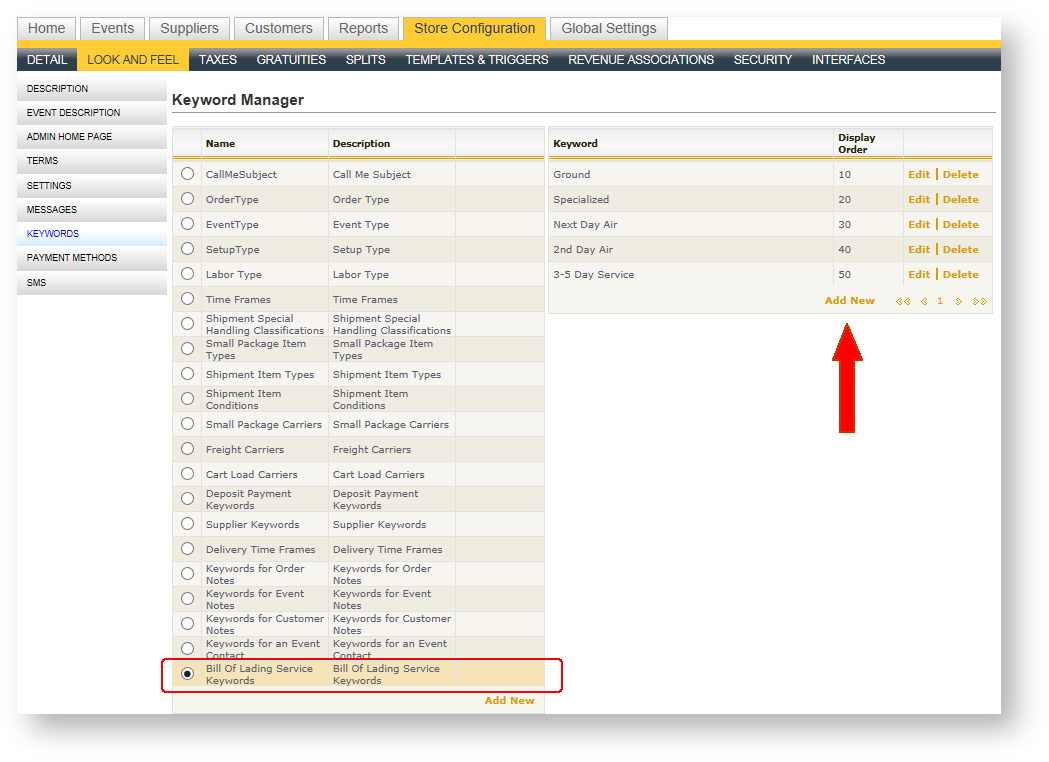
Setting up the Service Type Keywords
The Bill of Lading allows the customer to indicate the type of service desired:

The list of available values is configurable in the Keywords area. The only value by default is "Other", so you may be interested in adding more. To do this, you must have access to the Store Configuration tab:
- Click on the Store Configuration tab.
- Click "Look and Feel" in the dark blue menu.
- Click "Keywords" down the left hand navigation menu.
- Scroll down to "Bill of Lading Service Keywords" and click to make it active.
- On the right side, a grid loads with a list of the current keywords defined for this keyword type.
- Click "Add New" to add additional keywords. The display order will determine the order in which the value will appear in the drop down.
- Repeat "Add New" until all your values have been created.
Bills of Lading in Admin Portal
If the event level setting has been set to enable the bill of lading, an additional menu option appears at the bottom of the left hand navigation menu of the exhibitor. Clicking on the option loads a grid with any Bills of Lading that have been created for the customer:
Add New
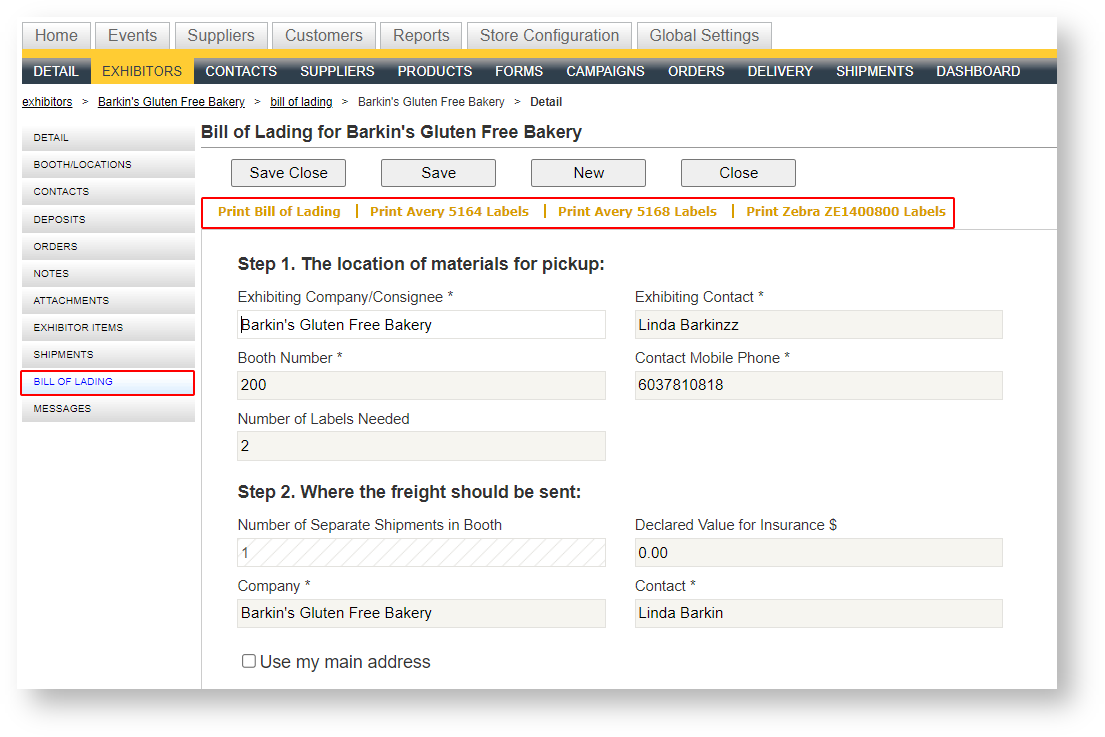
An admin user can add one or more bills of lading for a customer from the Admin portal. To add a bill of lading:
- Click "Add New" at the top of the Bill of Lading grid.
- Fill in the details of the Bill of Lading form that appears.
- Click "Save" or "Save/Close".
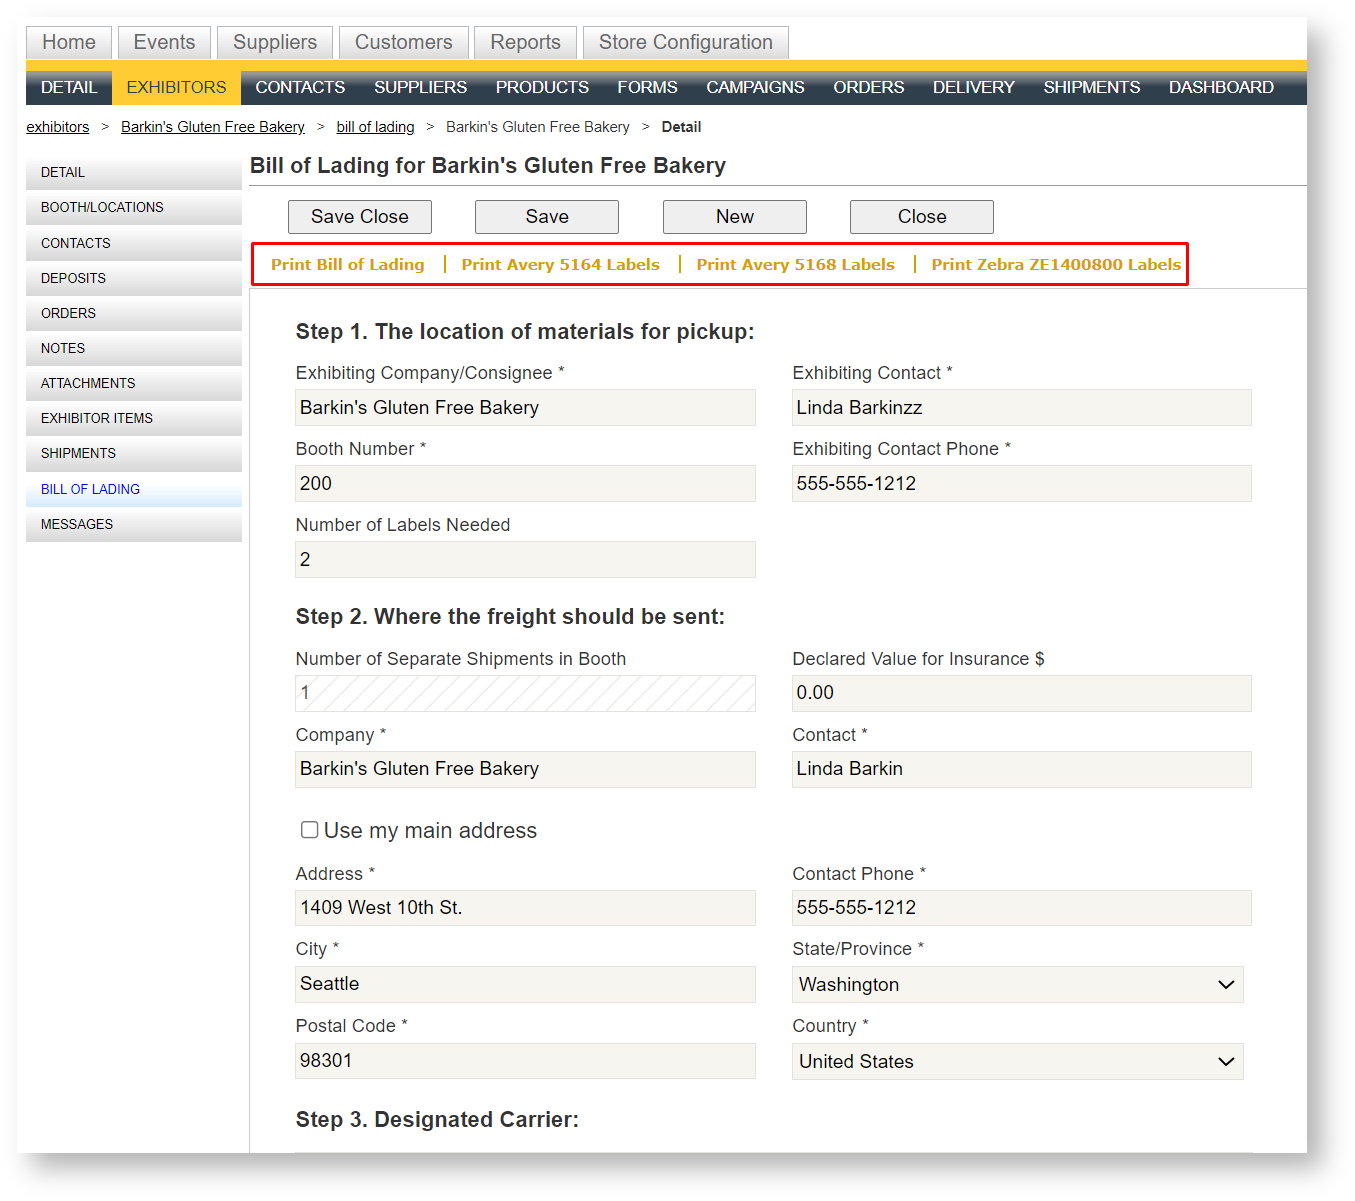
Print Bill of Lading
You can print one or more bills of lading from the grid within a customer:
- Select one or more rows by checking the box on the left hand side. To select all, click the upper most left hand square.
- Click "Print Bill of Lading" at the top.
You must first select at least one bill of lading in order for the Print command to work.
Print Avery 5164 Labels
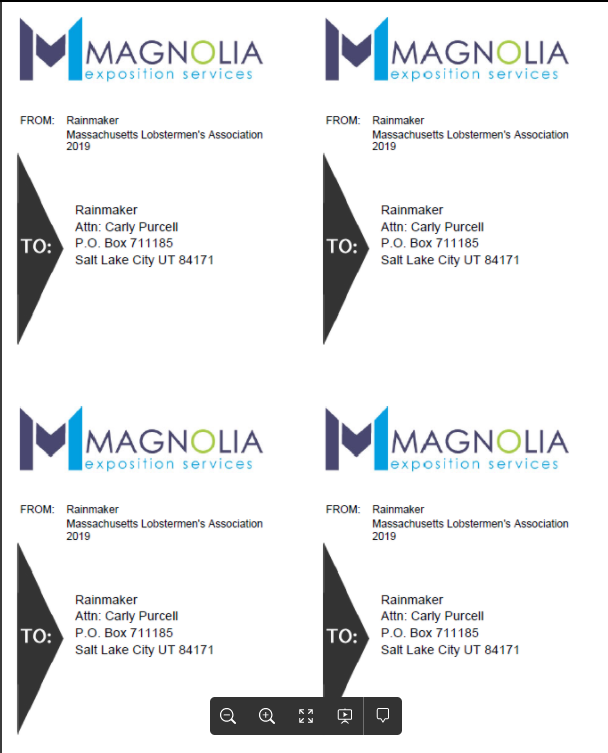
You can print labels for one or more bills of lading from the grid within a customer For an example of what these labels like, see this help topic: Outbound Labels - Avery 5164.
- Select one or more rows by checking the box on the left hand side To select all, click the upper most left hand square.
- Click "Print Avery 5164 Labels" at the top.
You must first select at least one bill of lading in order for the Print command to work.
Print Avery 5168 Labels
You can print labels for one or more bills of lading from the grid within a customer. For an example of what these labels like, see this help topic: Outbound Labels - Avery 5168.
- Select one or more rows by checking the box on the left hand side. To select all, click the upper most left hand square.
- Click "Print Avery 5168 Labels" at the top.
You must first select at least one bill of lading in order for the Print command to work.
Edit a Bill of Lading
To edit a bill of lading, click anywhere in the row of the bill of lading, or click "Edit" in the row of the bill of lading located in the right most column.
Delete a Bill of Lading
To delete a bill of lading, click "Delete" in the row of the bill of lading located in the right most column.
Email Campaign With Instructions
An email template may be sent to exhibitors that provides instructions on how to request the bill of lading and pre-printed labels. The email template looks like this:
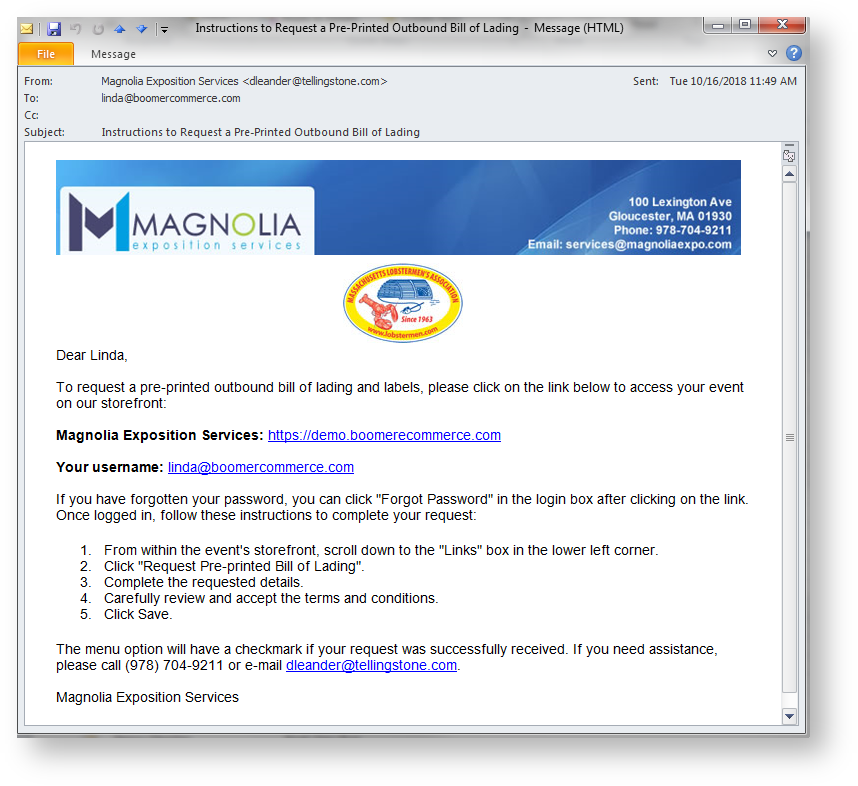
See Campaigns (E-mail) for details on sending an email campaign.
Printing Bills of Lading and Shipping Labels
A bill of lading looks as shown below:
Two different label formats are supported:
Avery 5164 Labels (6 per page):
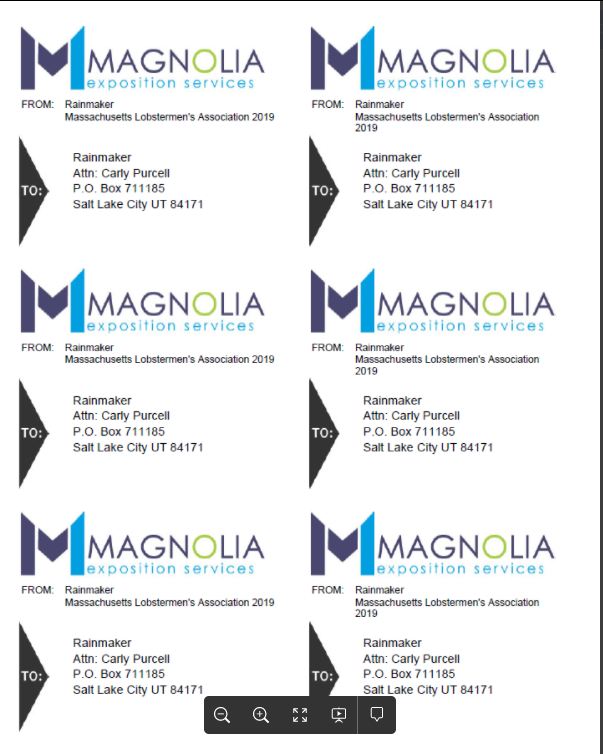
Avery 5168 Labels (4 per page):
Print For a Single Customer
You can print a single bill of lading and/or the shipping labels by opening the bill of lading and using the print command:
Note that the label formats expected for the outbound labels is Avery 5164 and Avery 5168. We will continue to add other formats based on the most popular label types used.
Print Multiple Bills of Lading and/or Labels
To print multiple bills of lading and/or labels for one customer, see the option at the top of the Bill of Lading grid. To print all bills of lading and outbound labels may be printed via the Reports menu For documentation related to the available parameters, see Bills of Lading Report , Outbound Labels - Avery 5164 and Outbound Labels - Avery 5168